Django and Python keep releasing new versions, so I wanted to take some notes as I start a new project in October of 2023.
Tools I’ll be using:
asdf – I use this to manage python versions (an easy way to have multiple version of python installed and be able to have different directories/projects use different versions)
pipenv – is “a Python virtualenv management tool that supports a multitude of systems and nicely bridges the gaps between pip, python (using system python, pyenv or asdf) and virtualenv”
python – your favorite program language
django – your favorite high level python web framework.
Let’s get started – python first
python --version
Python 3.9.14
While that’s a huge step ahead of Python2, for this new project I want the latest and most stable.
asdf latest python
3.12.0
I have no reason to have on the .0 version, but let’s see what asdf has for version 3.11
asdf latest python 3.11
3.11.6
OK – that sounds good. Let’s use that.
asdf update
asdf install python 3.11.6
asdf reshim python 3.11.6
asdf local python 3.11.6   # This
Now that we have 3.11.6, let’s create the directory that we want to use for the project.
python --version  # let's see what the "global version is"
Python 3.9.14     # still set to the older version

mkdir my-new-project
cd my-new-project
asdf local python 3.11.6

python --version  # what about now?
Python 3.11.6     # OK, that's good enough for me
Time to get pipenv going
So, I had a bit of a hard time getting pipenv to work with the newest asdf version of python. Here’s what helped:
# make sure you are in the correct project directory
# and that the directory is empty
python -m pip install --upgrade pip
pip install pipenv
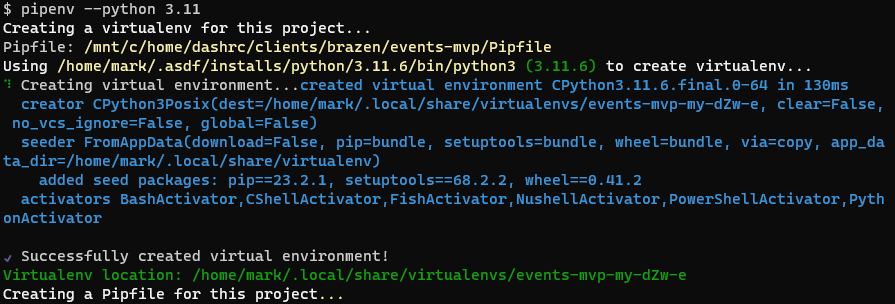
pipenv --python 3.11Here's a screenshot for what happened.
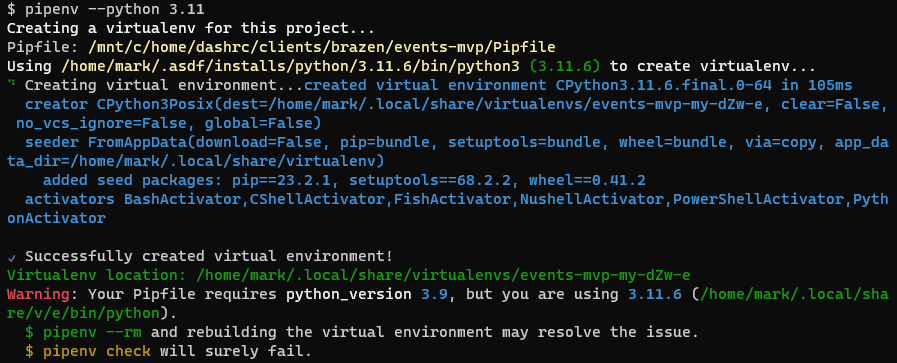
I want to show you what happens if you have an existing Pipfile in the directory, and if that Pipfile contains a python [requires] section that looks like this:
...
[requires]
python_version = "3.9"
...
Now for some django
pipenv install "django>=4"![pipenv install "django>=4"
Installing django>=4...
Resolving django>=4...
Added django to Pipfile's [packages] ...
✔ Installation Succeeded
Pipfile.lock not found, creating...
Locking [packages] dependencies...
Building requirements...
Resolving dependencies...
✔ Success!
Locking [dev-packages] dependencies...
Updated Pipfile.lock (97f99baf1b56a396a4dd34bb22964db55993d76c480132cfaabfef55aa8444c1)!
Installing dependencies from Pipfile.lock (8444c1)...
To activate this project's virtualenv, run pipenv shell.
Alternatively, run a command inside the virtualenv with pipenv run.](https://markcerv.com/wp-content/uploads/2023/10/image-2.png)
Once django is installed, you will need to fire it up:
pipenv shell
django-admin startproject config .
Note in the above I used the word “config” — I intentionally choose to do that so that all of my config files end up in that config directory. And actually I’ll do a little bit more than that by converting the settings.py file into a settings/ folder with:
mkdir config/settings
cp config/init.py config/settings
mv config/settings.py config/settings/base.py

# Create a new config file by running this cat command
# cut and paste from first "cut" to final "EOF" in a shell

cat <<EOF > config/settings/local.py
# Django settings
#

# These are the settings for a local environment
from .base import *
EOF
What about the database?
In my live environments I always use PostreSQL, so I mimic that behavior on my local machines by running on PostgreSQL locally on my Ubuntu server (via WSL2)
Don’t forget to add in the psycopg2 pip library
pipenv install psycopg2After that, you’ll need to login as the postgres user on your machine, and create the database and assign a password.
sudo su - postgres

# do this inside of the postgres account

postgres_db_and_user=tvcodes
createuser $postgres_db_and_user
createdb -O $postgres_db_and_user  $postgres_db_and_user

psql
## these next commands are INSIDE the postgresql shell

alter user xxxxDBUSERNAMExxxx with encrypted password 'whatever_password_should_be';

(hint: https://bitwarden.com/password-generator/)
what does that look like?
psql
psql (14.9 (Ubuntu 14.9-0ubuntu0.22.04.1))
Type "help" for help.

postgres=# alter user my_awesome_project with encrypted password 'whatever_password_should_be';
ALTER ROLE
postgres=# quit
postgres@localhost:~$
logout
And what do the variables look like?
DATABASE_URL=postgres://my_awesome_project:whatever_password_should_be@localhost:5432/my_awesome_project
Let’s use local environment variables
We want to NOT put important variables directly in the code, so the modern day solution is to use environment variables. I’m influenced by: https://pypi.org/project/environs/
pipenv install environs[django]Now create a .env file at the same level as your manage.py file that looks like this:
cat <<EOF > .env
#
DJANGO_SETTINGS_MODULE=config.settings.local
#
DEBUG=True
SECRET_KEY="not so secret on local"

DATABASE_URL=postgres://my_awesome_project:whatever_password_should_be@127.0.0.1:5432/flytest
EOF
Let’s login locally
Let’s create a user we can login with:
python manage.py migrate
python manage.py createsuperuser
python manage.py runserver 0.0.0.0:8000
NOTE: This might fail if you don’t have environment variables configured yet. If using VSCode,